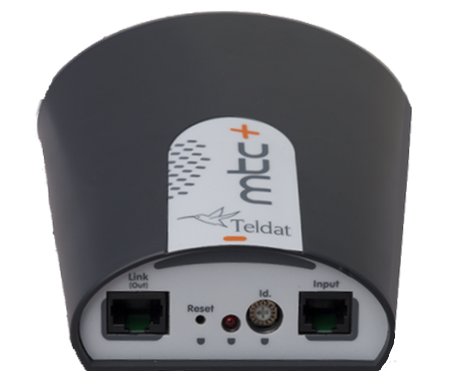
Power-Switch (MTC+)
This chapter covers some aspects related to the power-switch service, which allows you to configure and manage power-switches (MTC+) in OSDx.
An MTC+ device makes it possible to remotely control the power flow of any external device connected to the Controlled Power Supply (‘AC Out’ port). There are two possible scenarios:
Allow power to flow: In this scenario, the Controlled Power Supply Light (‘On’ LED) will be ON and the external device receives power (Note that this is the initial status of the MTC+).
Cut power flow: In this scenario, the Controlled Power Supply Light will be OFF and the external device does not receive power.
The change from one state to another is carried out through the management interface (‘Input’ port), which must be connected to a Teldat router. This interface serves as the primary control point for the device’s operations. The Controlled Power Supply Light (‘On’ LED) provides a visual indicator of the device’s current state.
Pressing the Reset button for approximately 5 seconds will cut the power supply of the controlled power supply interface.
Note
OSDx only supports Teldat MTC+ power-switches:
Configuration
In order to connect and use an MTC+ power-switch, you must first set the console port of the OSDx device to power-switch mode.
You can do this with the service power-switch command from a Telnet or SSH session:
set service power-switch
Once commited, this will allow the OSDx device to communicate with the MTC+ power-switch while the service is set.
Caution
You will not be able to manage your OSDx device by connecting to the console port while this mode is enabled,
Therefore, it is crucial to establish an alternative method for accessing the device’s Command Line Interface (CLI),
such as SSH or Telnet, and use service power-switch from that session.
See SSH or Telnet
documentation to know more about these services.
To restore normal operation to the console port and regain access to the device’s CLI through it,
execute the delete operation on the same service power-switch command.
This will revert the settings and allow CLI access via the console port again:
delete service power-switch
MTC+ Commands
The operational commands in this service, except scan and list, expect an MTC+ ID as the last argument. This ID is physically selected on the MTC+ ID rotary switch:
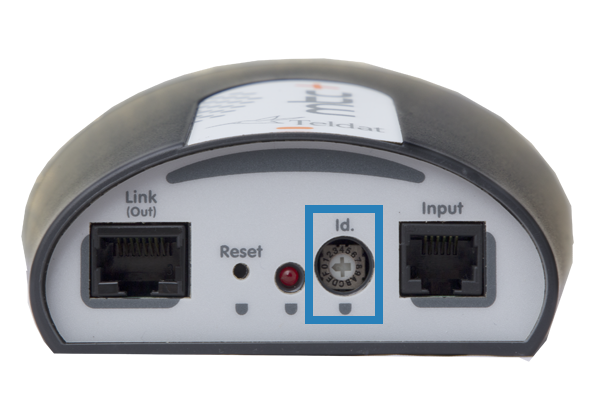
These IDs range from ‘0’ to ‘F’:
0 |
1 |
2 |
3 |
4 |
5 |
6 |
7 |
8 |
9 |
A |
B |
C |
D |
E |
F |
Here are some examples of power-switch commands with an MTC+ ID as the last parameter:
service power-switch status 0

service power-switch version 0e

service power-switch on a

service power-switch off 00
You can also use ‘all’ as the ID, so that the command is sent to all registered devices (To register devices, see scan command):
service power-switch version all

service power-switch off all
The commands accepted by MTC+ power-switches are:
service power-switch scan, to manually detect and register connected power-switches.Please note that the process could take up to 40 seconds to complete, since it searches for power-switches with any of the possible IDs.
When the system displays the IDs of the power-switches you want to register, you can press any key to stop the search for more IDs. It’s recommended to use the lowest IDs first, as the system checks these first, making the process more efficient.
service power-switch list, to show all registered power-switches.
service power-switch delete <txt>, to delete a power-switch with the specified ID or all registered power-switches.Please note that once the device is deleted, it will not register back automatically. If you want to register it again, you will need to either use
service power-switch scan, disconnect it from its power source and then reconnect it to restart it, or press the physical reset button on the device.
service power-switch on <txt>, to allow power to flow on the MTC+ with the specified ID or on all registered power-switches.
service power-switch off <txt>, , to stop the power flow on the MTC+ with the specified ID or on all registered power-switches.
service power-switch reset <txt>, it is the equivalent to an OFF command which after 10 seconds is followed by an ON.
service power-switch status <txt>, to show the status of an MTC+ with the specified ID or of all registered power-switches.
service power-switch temperature <txt>, to show the temperature of an MTC+ with the specified ID or of all registered power-switches.
service power-switch version <txt>, to show the version of an MTC+ with the specified ID or of all registered power-switches.
service power-switch voltage <txt>, to show the voltage of an MTC+ with the specified ID or of all registered power-switches.
If an MTC+ with the specified ID isn’t connected, you can either wait for a few seconds, or press a key to stop waiting for a response from that ID.
Note
If you change the ID of an MTC+ while it’s connected, it will warn the router to change the ID that it was previously registered with.
To illustrate this, imagine that you connect a MTC+ with the ID 00. It should automatically register and show up when you call the
service power-switch list command. If not, you use service power-switch scan to register it.
Once it’s registered, change the physical ID of the MTC+ from 00 to 01. This will unregister the ID 00 from the router, and after a few seconds,
the new 01 ID will be registered and appear when calling the service power-switch list command.
Additionally, if you connect a new MTC+ or reset it with the physical reset button, it will be automatically registered.
Power-switches that are not detected in a period of 2 minutes will be automatically unregistered.
Examples
It is possible to connect up to 16 MTC+ power-switches to a single OSDx device. In this section, possible modes of use are explained.
Important
Before you proceed with these examples, ensure that you have activated the power-switch mode for the console port
on your OSDx device by using the service power-switch command.
Connecting one power-switch to an OSDx device
Select the ID of the MTC+ you want to connect, using the rotary switch.
Use the supplied cable to connect the console port of the router (RJ45) to the ‘Input’ port (RJ11) of the MTC+ power-switch.
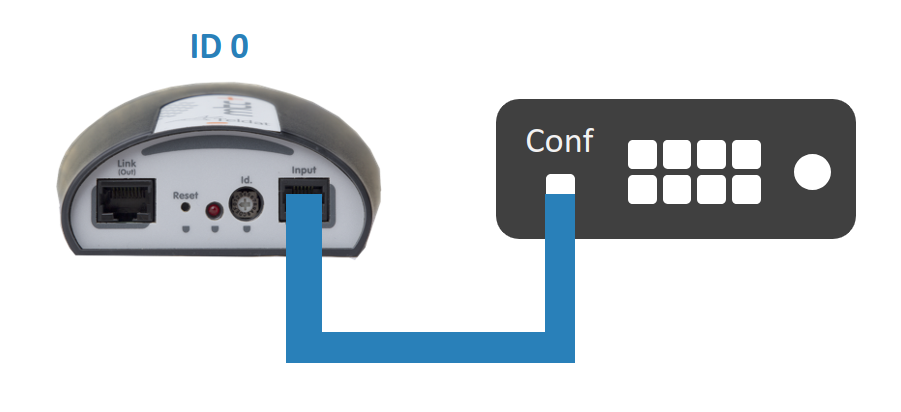
Connect the MTC+ ‘AC In’ port to an adequate power source.
Once the MTC+ power-switch is plugged in to a power source, it will automatically register in the router. If running the
service power-switch listcommand doesn’t show the ID of the connected MTC+ after 15 seconds, you can manually register the device usingservice power-switch scan:user@osdx$ service power-switch scan Press any key if there is no answer from the power switch: Found: 00-ON
You should now be able to execute any command indicating the ID you selected on the MTC+ or using the ‘all’ keyword. For example:
user@osdx$ service power-switch version 0
Press any key if there is no answer from the power switch:

00-v1.0-MTC+

user@osdx$ service power-switch off all
Press any key if there is no answer from the power switch:

00-OK
Connecting more than one power-switch to an OSDx device
Select a different ID for each power-switch, using the rotary switch.
Attention
Make sure each power-switch has its own, unique ID. If two or more power-switches have the same ID, it could lead to unpredictable behavior.
Use the supplied cable to connect the console port of the router (RJ45) to the ‘Input’ port (RJ11) of one of the MTC+ power-switches. See ‘Connecting one power-switch to an OSDx device’.
For the rest of the MTC+, arrange a daisy chain connecting the ‘Link (Out)’ port of the MTC+ nearest to the router to the ‘Input’ port of the next MTC+.
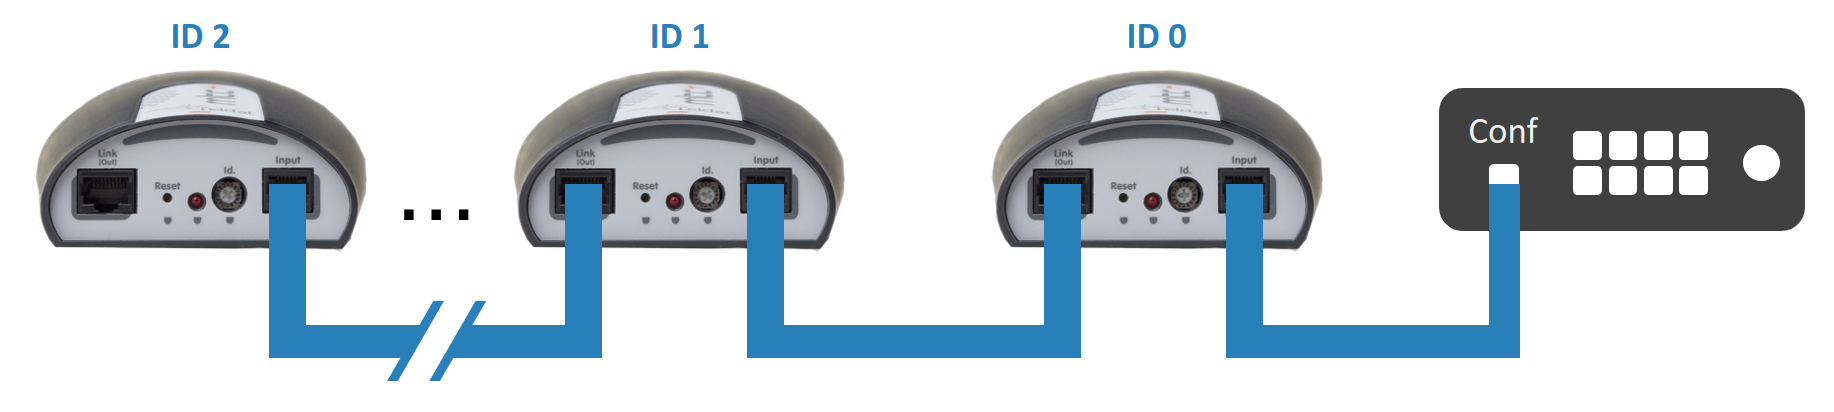
Connect all the MTC+ ‘AC In’ ports to an adequate power source.
Once the MTC+ power-switches are plugged in to a power source, they will automatically register in the router. If running the
service power-switch listcommand doesn’t show all the IDs of the connected MTC+ after 15 seconds, you can manually register the devices usingservice power-switch scan:user@osdx$ service power-switch scan Press any key if there is no answer from the power switch: Found: 00-ON Found: 01-ON Found: 02-ON
You should now be able to execute any command indicating the ID you selected on each of the MTC+ power-switches or using the ‘all’ keyword. For example:
user@osdx$ service power-switch version 0
Press any key if there is no answer from the power switch:

00-v1.0-MTC+

user@osdx$ service power-switch off all
Press any key if there is no answer from the power switch:

00-OK

01-OK

02-OK
Final steps
After registering the connected devices, use service power-switch list to check the IDs of the registered power-switches.
user@osdx$ service power-switch list
MTC+: 00
MTC+: 01
MTC+: 02
You can now execute service power-switch status all to check whether the registered power-switches are currently supplying power or not,
and to confirm that the set-up is working correctly:
user@osdx$ service power-switch status all
Press any key if there is no answer from the power switch:

00-ON

01-ON

02-ON
To make the MTC+ supply power or not, use service power-switch on <txt> or service power-switch off <txt>, respectively:
user@osdx$ service power-switch on 1
Press any key if there is no answer from the power switch:

01-OK

user@osdx$ service power-switch off 2
Press any key if there is no answer from the power switch:

02-OK

user@osdx$ service power-switch on all
Press any key if there is no answer from the power switch:

00-OK

01-OK

02-OK